Showing posts with label national craft month. Show all posts

March 27, 2012


My babyblog is one month old TODAY! And what a month it has been, lemme tell ya. These have been some of the most eventful thirty days of my life; so much joy, discovery, confusion, growth, and many, MANY lessons learned. That's the beauty of life though, isn't it? You'll never be the same person today that you were yesterday, or the day before that, or before that....I cherish the experiences of this month with my whole heart and am so excited to see what the next one brings!  

Also, I forgot to say this yesterday, but it bears mentioning: the end of National Craft Month is near, sad DAY! Yesterday completed the NCM series, but that doesn't mean the party’s over; faaar from it, friends. Every month is craft month in my opinion, and the year is still young! I will say though, I kind of totally bit off more than I could chew, diving right into a tutorial series as a new blogger. It was definitely a huge challenge, but I had a great time putting it together. I hope you enjoyed it as much as I did!

So, what’re you celebrating today? 


March 26, 2012

National Craft Month: Contain Yourself, 3 Ways.


Spring is finally here, and you know what that means…spring cleaning! I don’t know anyone who’s ever actually stuck to this ‘clean once a year’ bit, but I completed phase one of my cleaning in January and there’s still plenty of work to be done. Everyone and their mother is having sales on bins, boxes, and organizational whathaveyou to aid the toss-out process, but when you’re on a tight budget, it gets a little tricky. How do you clear the clutter without spending a boatload?

Easy! Almonds and oatmeal.

No really! This week’s DIY is a great way to get organized using the resources around you, and I've got three ideas on how to do just that.


1. Lacy Vase You will need:
1. Cut a piece of lace large enough to wrap around the canister, with extra for overlap. Apply fabric glue with paint brush around the top rim of the canister, just under the lip. Glue the top part of the lace all the way around. Smooth the lace as you go so it lays flat along the canister surface. 


2.  Glue the first edge of lace to the canister. Glue the overlap edge after the first has dried. I let mine overlap about ½ inch so that the bottom pattern of the lace was continuous. Add tiny dots of glue to the bottom lace edge if they stick out too much.


3. Thread your needle and circle stitch all the way around the rim of the canister, and there ya go! Fill with flowers to brighten up a room or use as a centerpiece, or organize your crochet needles! 


2. Striped Supply Holder You will need:

*disclaimer: When I made mine, I painted the colors backwards…so the photos are misleading-ish. I’ll explain.

1. Paint the entire canister with your basecoat color. I accidentally grabbed the green while doing this, but my basecoat should’ve been off-white. Let dry completely.


2. Tape off the edges of your stripes. Paint within the taped lines. I had to use the tape AS my stripes to reverse my basecoat mistake and it turned out alright, but if you’re using darker colors this might be more difficult. Allow paint to dry completely and then remove the tape. There ya have it! Clear out some kitchen drawer space (t-shirt DIY deja vu, anyone?) by storing cooking utensils in your nifty new container! You could also save the lid and use in your sewing room to store smaller bits of scrap fabric. 


3. Fabric Organizer You will need:


1. Cut a piece of fabric large enough to wrap around the container, with extra for overlap. Don’t worry if it hangs past the bottom of the container either, we’ll get to that! 


Apply fabric glue with paint brush along top and bottom rims of container, smoothing fabric as you go. Glue edges. Let dry.


2. Trim bottom excess with the exacto knife, using the bottom rim as a guide. Wasn't that easy? Use as a desktop organizer for pens and pencils orrrr... I'm making a few of them to organize some of my smaller craft supplies, so I'm saving the lids. Wouldn't they look cute stacked and labeled?  


A few more tips on tidying up:
·  Scour your local thrift store for cheap wicker baskets, bins, jars, and vases
· Wrap small boxes or shoe boxes with fabric or wrapping paper that matches your décor to organize craft supplies or photos on a bookcase
·  Hobby Lobby has a great selection of mason jars and general glass containers for the kitchen or sewing room. I bought a tiny one recently for all of my buttons! Might be in the market for some larger ones to organize my flours pretty soon.


If you’re in need of some de-cluttering as badly as I am, I hope this inspires you to get started and have some fun while doing it! What does ‘spring cleaning’ look like for you? Do you have any organizing tips to share? I’d love to hear them! 


March 19, 2012

National Craft Month: DIY T-Shirt Utility


I'm a hoarder collector by nature.

My craft shelf is packed with odds and ends and waytoomuch yarn. My tub of fabric has long maxed its capacity. The closet can't hold anymore cardboard or paper or thrifty clothes to be altered (but don't you dare throw out that almond container! I can totally use that!) ...yikes. And of course, I've accumulated ohso many t-shirts...festivals, shows, random college events (and what college kid/person in general doesn't like free stuff?!). It's problematic when keeping your clothes organized equals impossible because you can't open and/or close this drawer because it's stacked to the brim with folded tees. That you don't even wear. That you will probably never wear again. Ahem.


So you might be able to sell a few, or just donate the whole lot. That's well and good. I've done both many times. But here's the thing: your old t-shirts are literally bursting with craftastic potential (I mean literally bustin' outta that drawer, girl. BEGGING for attention). SO. This week, I'm cleaning out my closet and giving a few of my old threads some new life! Here’s the scoop:

The T-shirt Bag


As a “collector”, my day-to-day bag is full of extra crap I probably don’t need. Like 17 bobby pins, or Vicks vapor rub, or three packs of travel tissue. Or 10 highlighters, 6 pens, 3 pencils. Geez Jessica. Geez. Add to that “necessities” like phone, wallet, cigarette case, body spray (you’re not takin’ my spray!), idea notebooks and planner and well…you’ve got yourself a bag o’ bricks to carry. That’s why I’m not sure a t-shirt bag is really utilitarian for my purposes, but maybe if I line it with something? For now, mine are strictly for yoga mat and yarn project use. They probably make great beach or produce bags too. So there you go.

PS you already have everything you need to make this project. Read: t-shirt, scissors, and a safety pin. Gotta love simplicity. Tutorial here.

T-Shirt Yarn


I almost peed my pants when my sister showed me this DIY. Ok no I didn’t, but I was pretty stinkin’ excited. Remind me again why I need more yarn? But it’s made from t-shirts! And takes 10 minutes to make!  And...you see where I'm going with this. 

The T-shirt Necklace/Headband


I get Martha Stewart craft emails to my inbox every day. Yes, I’m that girl. Most of the time they’re a little meh but a few weeks ago this one brightened my day. My first attempt was a little short for the necklace I wanted, but it makes a great headband, so I’m not complaining. I made a second one out of a larger shirt, and it turned out beautifully. PS I braided my strands of fabric because I didn’t like the look of them by themselves. Add some beads to spice it up if ya fancy.

Make It Cute


So you’ve cleaned out your t-shirts. You’re preparing to repurpose or rid yourself of them forever. But wait, this one is actually kinda cool. And this one has a lot of great memories attached to it. On second thought, maybe you’ll just keep a few of them…


No! I mean yes! Look, this happened to me while working on this post. You love the shirt, hate the way it fits, don’t wear it ever but are content to let it sit untouched, taking up space. Alter that mess! Turn oversized tees into long racerback tanks you can wear with tights, or crop tops for summer. Take 'em in and cut off the sleeves (or make them cute like this).

And when all else fails, cut up your shirt and sew it into a pillow, so now you can stare at it all you want without wasting any precious space in your drawer. Problem solved.

What do you use your old t-shirts for? PS If you make any of these projects I’d love to see pictures! Email them to me at onetwothreepeaceful(at)gmail(dot)com, and I’ll post your fancy craftin’ skills. Have a tee-rific day! (haha...that was a terrible joke, sorry)


March 12, 2012

National Craft Month: Crochet Week


Normally, Mondays elicit a pretty distinct soul-groan from me. The weekend is over, it’s back to work and errands and so much less free time to create. Today is a liiiittle bit different though. It just so happens that the second week of March is National Crochet Week, and because I’ll never pass up the opportunity to celebrate random “holidays”, you’d better believe this week’s craft is crochet-related! I’ll admit that brainstorming for a cute but quick project to share (especially after last week’s mammoth post; sorry guys!) didn’t yield a whole lot of results at first. In fact, the inspiration for today’s project was the result of a rapidfire stream of consciousness following a conversation with my boyfriend about the yoga mat I want to purchase with My Coke Rewards points. The result? Crochet buttons.


I used this pattern, but I found another one that’s pretty basic as well. I played around with different yarns and hook sizes until I found ones that gave me the size/texture of button I was looking for. I ended up using a 3mm hook, and I probably wouldn't go above 4mm for this project. Of all the yarns I played around with, Caron Simply Soft was both the easiest to work with and produced the cutest button. Also, I filled my buttons with extra yarn scraps to make them more puffy. 

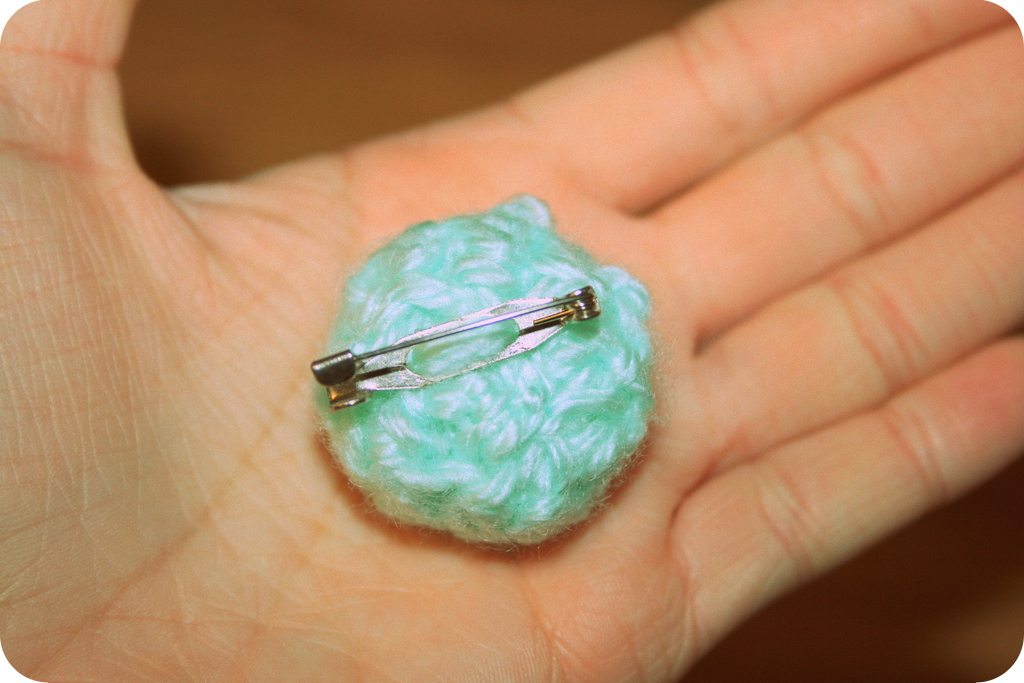
I know, I know. Crochet buttons are great, sure, but what the heck can ya do with them? Here's an idea: make a brooch! You will need:


  • a crochet button (pattern in links above)
  • a brooch pin
  • yarn needle
  • scissors


Thread the long button tail through the holes in the brooch pin. The idea is to sew the pin to the button using the tail. Tie off and finish. 


Ta-da! Now you have a cute little crochet pin to add some texture to your outfit. Other crochet button ideas:
  • top off a hat
  • add some fun to a knit sweater (I'd just do the buttons...those sleeves are way outta control)
  • crochet button bracelet (I'm going to try this one soon)
  • add to a headband
  • add some texture to an art project (ie painting, frame, etc)
I know they're kinda dorky but I absolutely love them right now, for whatever reason haha. What would you use them for?! I'd love to hear your brilliant ideas! 


In the spirit of National Crochet Week, I’d also like to share some of my favorite and most recent crochet projects. As I was making a list of To Dos for 2012, I decided that I really wanted to crochet a chevron throw blanket. I started strong in January, working on it almost every day. As life got busier, I worked on it less and less. Eventually, I set it aside altogether. I haven’t lost interest in it though; it’s become a perfect go-to project when I’m burned out on something else. I’ll just pick it up, crochet a few rows, and bam. It’s the perfect long-term project for me, and I have no doubt that it’ll be completed by my December deadline!


Also, I’d like to share some of my favorite patterns from some fabulous crochetin’ ladies:

Photo from Peoplewebs
 This crocheted bow headband by Lindsi of Peoplewebs is so so cute! I used to "make" these (or pretend to make them? Ha) when I was first learning to crochet. Great project for beginners to work with the basic single crochet stitch. Click the link for the pattern, or order one from her Etsy shop! She has a few different colors available right now. 

Photo from Peoplewebs
Ok I know it's warming up a bit lot (in the south. Maybe not up north?) but AHHHHHHHthechunkycirclescarf! Yet another lovely pattern from Peoplewebs (I'm such a fan of this blog...seriously. All about it. This girl's got madtalent). This was my very FIRST "major" crochet project that I ever completed/looked halfway decent, haha. You can purchase one of these from her shop as well. 


This crochet heart pattern created by Rachel of Cornflower Blue Studio is awesome. It's literally a five minute project and the result is completely adorable! The pattern is written in an easy-to-read photo tutorial form; perfect for visual learners like myself. 

Completely unrelated sidenote: Today is Jack Kerouac’s 110th birthday! I first read On the Road when I was 14; totally had the crosscountry travel itch for the rest of 8th grade/my life haha. Such a great read, to this day! PS I can totally use this as an excuse to bake cupcakes, right? (;

Photo from 9 Pound Hammer  

March 5, 2012

National Craft Month: DIY Word Banner


It’s time for the second installment of the National Craft Month series! This project is something I came up with while brainstorming handmade Christmas gifts last year. I was really inspired by Happy Birthday and Happy New Year banners, but I wanted something more personalized. It’s great for your room or living room, or even parties. The instructions are a little lengthy, but it’s really not as involved as it seems. Most of the elements I make/do by hand in this project have time-saving alternatives. I only chose to make everything myself because I’m a broke college kid, and this is something I can create without spending a dime.

I gave a lot of these as gifts over the holidays, but never got around to making one for myself. It took me awhile to decide what word or phrase I wanted to use for this DIY, but in the end, I was inspired one of my favorite songs (one that I'm CONVINCED was written for me) - Vienna by Billy Joel. I think it's completely appropriate.


I know there are more of us out there, the ones who go go go at 1000miles per minute without stopping. Every second of every day superscheduled and jam-packed down to the last second…it wears you out. It’s in my nature to rush around and take on more than I should, so I took this semester off in an effort to rework the way I do things. I don’t know about you, but I don’t want my life to pass by in a blur of schedules, assignments, endless lists, and errands. I want to soak up and fully appreciate every moment, every detail. I just want to s l o w d o w n . This banner is a great reminder of that. Quick sidenote: Any word/phrase over 10 letters becomes kinda tedious. It can definitely be done, but if you’re doing all handmade like me, it will take you awhile. Also, if you have any questions about materials, steps, or if any of the instructions are unclear, please please please let me know! This is the first DIY I’ve ever written, so bear with me (:

Alright, let’s begin! You will need…


• A cereal box, or any sort of thin cardboard (I used drink holders from Sonic for my first few)

• Yarn or cotton string (twine, etc)

• An assortment of decorative paper (scrapbook, magazine, wallpaper, even fabric); one pattern/color per letter

• A few pages of cardstock (depends on the number of letters you’re making)

• Scissors

• Pencil

• Permanent marker (not pictured, oops!)

• Gluestick

• Tape

• Large circular paper punch (3” diameter) or something round to trace (I used the second method for all of my gifted banners, but I FINALLY bought a circular punch about a week ago; saves SO MUCH TIME!)

• Stencil (optional)


Now, grab some cardstock and a pencil; it’s time to make your letter templates (you’ll trace these onto the cereal box in a bit). I drew mine by hand and cut them out, but if you’re not comfortable with/have the time for that, you have a few options. Stencils and die-cut letters work just fine! Another idea is to find a font you like and print out your letters, just space them out and blow them up to the size you want. Just cut those out, and voila! See? The possibilities are endless.


Now, punch out your circles, one for each letter (or trace your circular object and cut them out if you don’t have a punch). These are the backing for each letter; they reinforce the letters and add some color to the project.


Cut open the cereal box so it lays flat. Lay your letters BACKWARDS on the printed side of the cereal box, otherwise you’ll end up with the design on the front of your letters and marker all along the edges :/ Grab your permanent marker and trace away my friend!


Cut those bad boys out!


It’s time to add some color! Take your decorative paper (remember, this can be anything: scrapbooking or wrapping paper, a colorful magazine ad, some scrap fabric, old book pages, etc) and punch out some more circles, one for each letter. Glue the paper ones to the cardstock ones. If you’re using the trace and cut method, simply glue your cardstock circles to each sheet of decorative paper you’re using, and cut them out. Much easier than tracing a second set of circles and gluing them together!


Decide what order you want the circles to be in. I’m really picky when it comes to stuff like this, so I lay it all out behind my letters first. Once you’ve paired up your letters and circles, tape each circle to the back of its letter. I usually add a little bit of glue on the back of letter too, just in case.


Lay out your letters. Measure a piece of string that is long enough to fit your word/phrase, leaving about a foot extra on each end. Don’t cut yet. I single-crocheted a chain using my largest needle to give it some texture. Don’t crochet? Don’t worry! You can use the string as is (I might double up the strands) or even braid it. Again, just make sure you leave at least a foot extra on each end. Once you decide that it’s long enough, snip it!


Take your loose end (the one not attached to the ball of string) and tie a bow. Place the bow at the beginning of your banner.


Arrange your first letter about as far from the chain as you would like it to hang. Cut a piece of string, and loop it from the center of the letter’s circle. Once you have that measured, cut one piece of string per letter. Fun variation idea: I haven’t tried this yet, but how about varying the string lengths so your letters aren’t straight across? Could be cool…


Tape the string to your letters. Don’t tape it all the way up the string just yet though.


Ok. If you’re using a crocheted/braided chain, use the stitches or braids to space your letters evenly along the chain. First, take the string loop and pull it through one stitch on the chain. Next, flip the letter through that loop. Pull the letter all the way through. Do that for each letter, spacing them as you go. Once all of your letters are attached, tie a bow at the other end of your string, and you’re done!


Here’s one I made for my dear friend Christine as part of her Christmas gift.

Photo by Christine Cote
Happy Monday! What kinds of crafty things are you doing this week?


LinkWithin

Related Posts Plugin for WordPress, Blogger...